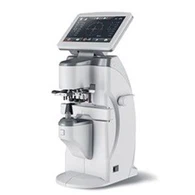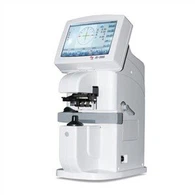


What is Auto Lensmeter D-910
An auto lensmeter D-910 measures the prescription of eyeglass lenses. It determines sphere, cylinder, axis, prism and distance between each optical center (pupillary distance). The lensometer is also used to accurately mount lenses into their frames as well as for orienting and marking lenses prior to cutting the lenses.
Benefits of Auto Lensmeter D-910
Precision
Auto lensmeter D-910 use advanced technologies to provide precise and reliable refraction measurements, reducing the risk of human error.
Speed
Auto lensmeter D-910 can quickly and efficiently measure lens power, allowing eye care professionals to see more patients in less time.
Versatility
Auto lensmeter D-910 can be used for a variety of measurements, including pupillary distance measurement, optical center height, automatic measurement taking, etc., offering great versatility for eye care professionals.
Why Choose us
Professional service
We can accept factory inspection and goods inspection at any time. Technical discussion, research and development of new products, and complete after-sales service.
Speed
Our organization is streamlined for fast turnaround on orders and immediate response to emergencies or unexpected opportunities.
Fantastic customer service
Nothing is more important to us than customer satisfaction. With our 'can-do attitude' we ensure our customers' expectations are exceeded at all times – from delivering great solutions on time to providing advice and resolving queries as quickly as possible.
Quality and satisfaction
Taiyuan North China Xinyuan Tech Center(CO., LTD.)
The company has a complete quality management system and various qualification certificates.


Adjustable LCD display screen
Sensitive touch LCD display screen
Measurement screen

Adjustable LCD display screen
Sensitive touch LCD display screen
Measurement screen

Better perfermance and economic choice
Easy operation with four buttons
Without PD,UV mesurement and more stable


Lensmeter JD-2000B
Without UV and printer

Measurement of PD, PH and PCL(Progressive Channel Length).
New capacitive touch panel with high resolution.
The different wavelength can be measured simultaneously.

Sensitive touch LCD display screen
Automatic recognition of single and progressive lens
Measurement of single vision lenses, bifocal(trifocal) lenses, progressive lens and contact lens
An auto lensmeter D-910 is an optometric device used to determine, or read, the prescription in an optical lens. The auto lensmeter D-910 reads spherical power, cylindrical power, axis, and pupillary distance, and can also determine prism in a lens. The measurement images inside the auto lensmeter D-910 are called mires, and are adjusted to determine prescription.
Adjust the eyepiece to Plano, or neutral position, by turning the drum handle on the right past zero, into plus, and then back into neutral position at Plano.
Place the eyeglasses on the platform so they are facing you, temples facing away. Lower the lens holder into place to steady the eyeglasses.
As in all optic procedures, begin with the right lens. Bring the mires into focus by turning the power drum to minus, then back toward you until the mires are solid. Mires are usually three solid lines in one direction and one or three thin lines in the opposite.
Read the mires. If all the lines come into focus at once, the lens power is spherical, with no astigmatism. If only the three thick lines or one thin line are in focus or appear broken, the lens has cylinder, or astigmatic correction.
Turn the power drum to bring the thin lines into focus and record the number as the sphere power. Adjust the axis wheel at the base of the auto lensmeter D-910 until the thick lines come into focus; record this number as the axis of the prescription. Rotate the power drum toward you again until the three thick lines come into focus, giving you the cylinder power.
Mark the P.D., or pupillary distance, with the drop-down marker. To read bifocals, turn the eyeglasses around and read the lower part of the lens from the back side. Subtract the spherical power of the add from the distance spherical number of the lens to determine bifocal power.
Types of Auto Lensmeter D-910
Manual auto lensmeter
The manual auto lensmeter is an instrument that utilizes a battery-powered, LED illumination system to measure the precise powers of the sphere, cylinder, axis, add, and prism of a lens manually. The two most common types of manual lensometer include the American Cross and European Dot.
Auto lensmeter D-910
An auto lensmeter D-910 is an automatic instrument that measures repeatable, fast, and reliable lens prescriptions. It is relatively less accurate but easily operatable compared to a manual lensometer. It employs a white light and ray-trace system to measure the powers of the sphere, cylinder, axis, add, and prism of a lens in a single operation. The values of each measure are then displayed digitally and can be printed or recorded manually.

Meet Your Auto Lensmeter D-910
The daily grind
When you first sit down with your auto lensmeter D-910 for the day, you should:
1. Focus the eyepiece by racking it fully outward, then slowly turn it back in until the prism reticle first appears sharp. This procedure corrects for the influence of operator eye error and accommodation. Note: Some operators advise placing a white piece of paper under the lens clamp to further help in determining reticle focus.
2. Use a soft lens brush with bellows to gently brush and blow off any dust on the exposed eyepiece lens. If the eye-lens is smudged, use a slightly moistened microfiber cloth to remove the smudge.
3. If possible, remove the lens stop and brush or blow off any dust in a similar manner.
4. Turn axis wheel to 180 degrees, and turn the reticle axis dial so it lines up with the 180 axis mire.
5. Ensure the target mire is centered in the middle of the reticle.
6. Focus the mire with no lens clamped in place. Note if power drum reads other than "0.00" (Plano). Any difference should be noted and carried to correct the powers found.
The auto lensmeter D-910 blind date
ECPs who work at multiple offices often have to use a auto lensmeter D-910 that they haven't met before-aka a "blind date." Anytime you approach a auto lensmeter D-910 you haven't used before, the six points mentioned above should be employed, along with the following:
1. Verify that the axis wheel rotates without the mire rotating in a circle around the center of the reticle. Correction requires a service technician.
2. Verify the target mire is precisely centered in reticle. Correction may require either adjustment of the field lens or realignment of the telescope. Either procedure requires a service technician. Note: If your auto lensmeter D-910 is equipped with a rotary prism compensator, this may be not zeroed out or aligned properly. This can be quickly adjusted by the operator.
3. Verify the marking device-With the target mire verified as properly centered, grab a sphero-cylindrical lens of a reasonable power-say a -2.00DS -2.00DC. With the axis set to 180 and the reticle aligned to the same, carefully center the lens and read it in minus cylinder fashion. Check through focus to ensure both meridians of the mire are precisely centered in the middle of the reticle. Now mark the lens. Carefully remove the lens and turn it 180 degrees. Center again and remark. Ideally, the second set of marking dots should be superimposed over the first set. Any error seen should be measured. Regarding the center dot, the tolerance in marking alignment is half of the ink dot diameter. Note that a 1 mm difference in center dot superimposition indicates half that value is the error. Example: A 1 mm displacement of the center dot indicates a 0.5 mm marker misalignment error. This applies to both horizontal or vertical meridians. Also note the axis superimposition of all three dots. Any displacement here reveals the marker is not precisely on axis, and the difference found is also twice the error. A skilled operator may be able to adjust the marker, but time and patience is required. A service technician may be required.
4. If the power drum is found to not zero out at Plano using the procedure outlined above, a quick shortcut for compensating for this error is to set the power drum to Plano and refocus the eyepiece using the target mire instead of the reticle. This may result in the reticle being slightly out of focus, which some technicians say might stimulate unwanted accommodation. This suggestion is a quick work around when the auto lensmeter D-910 is a "blind date."
5.Take multiple readings. Even with a known and well calibrated instrument, it is advisable to take at least three readings and average them for the best result. Research at American Optical suggests that skilled operators can improve accuracy by averaging at least 10 readings.
How to Use a Auto Lensmeter D-910
1. Get Comfortable
Position the auto lensmeter D-910 at a comfortable angle for viewing by using the locking lever or inclination control at the side of the instrument to adjust the tilt of the auto lensmeter D-910. This is also a good time to ensure the prism compensator is at 0.
2. Focus the Eyepiece
It is essential to focus the eyepiece for your eye if someone else has used the auto lensmeter D-910 before you. The video in the Multimedia Tab of this article called 'Setting up a auto lensmeter D-910 demonstrates how to focus the eyepiece. The steps are:
Keep the auto lensmeter D-910 power off.
Rotate the eyepiece counter-clockwise until the reticle is blurred. A white card or piece of paper held behind the eyepiece may make the reticle lines more visible.
Turn the eyepiece clockwise until the reticle is just clear. The lensometer is now adjusted for your eye. Note: Do not turn past the point at which the reticle is first clear.
3. Check Power Calibration
Ensure the power calibration of your auto lensmeter D-910 is accurate. This should be done occasionally.
Turn the auto lensmeter D-910 on.
Turn the power wheel into the plus, then slowly decrease the power until the auto lensmeter D-910 target is sharply focused. Do not oscillate the wheel back and forth to find the best focus. The power wheel should read zero if the instrument is in proper calibration.
If the power wheel does not read zero, re-focus the eyepiece and re-check the calibration. If the power wheel still does not read zero, the error must be compensated for on all future measurements made with the lensometer, or the lensometer needs maintenance. (Note: algebraically subtract the calibration error from the power measurement to compensate for calibration errors.)
4. Position the Spectacle Frame
Turn the spectacles so that the front of the spectacles is facing towards you. The temples (the arms of the spectacle frame) should be pointing away from you.
Put the spectacles on the frame table. The bottom rim of the spectacles should rest on the frame table.
Clamp the spectacle lens to keep it pressed against the lens rest. Note: always start with the right lens (for consistency)
Look through the eyepiece and move the spectacles side-to-side and up-and-down until the target is in the centre of the black graticule.
Change the height of the frame table to keep the frame horizontal in this position (that is, with the bottom rims of the spectacle against the table to make sure one side does not drop down)
5. Mark the Optical Centre
When the lens is positioned as above - where the centre of the auto lensmeter D-910 target is over the centre of the graticule - then you are at the optical centre of the lens. Note: if there is a ground prism in the lens, despite movements of the lens up-and-down or side-to-side, the auto lensmeter D-910 target will not be centred over the graticule - so there is no optical centre of such a lens.
Mark the optical centre. Auto lensmeter D-910 usually have an ink well and marking pins. When the lens is centred correctly, you can use the marking pins to put a mark (usually small dots) on the lens surface. If the vertometer does not have an ink well or marking pins, you can use a marking pen (felt tipped pen) to mark the optical centre of the lens yourself. You will need to make the mark on the lens directly over the lens rest.
6. Determine the Right Lens Power
With the right lens positioned at its optical centre, turn the power wheel to a high plus reading.
Slowly decrease the power (reduce the plus by turning the power wheel) until the target lines just become clear (Figure 3).
7. Determine the Left Lens Power
Without changing the height of the lens table, clamp the left lens in position
Centre the lens by moving it left-and-right as appropriate
There should be no need to move the lens up-and-down: the auto lensmeter D-910 target should be vertically aligned with the graticule at the table height used for the right lens. If it is not, then there is vertical prism between the lenses, which can be measured by the markings on the graticule.
Once aligned at the optical centre, mark the optical centre of the left lens and measure the power of the left lens using the same steps as for the right lens above.
8. Determine the Prism
If the auto lensmeter D-910 target (the green cross) is not centred vertically about the reticule, then there is vertical prism present
If the auto lensmeter D-910 target is below the horizontal then there is base-down prism
If the auto lensmeter D-910 target is above the horizontal then there is base-up prism
The size of the prism can be read from the reticle markings
Note: this method determines the total vertical prism between the two lenses. In order to determine the precise contribution of the left and right lenses to the total prism it is necessary to know the position of the patient's pupils relative to the optical centres of each lens. In practice, the total vertical prism is usually divided evenly between the two lenses
9. Determine the Near Add
Turn the spectacles around. The near addition is a measure of the front vertex power - as opposed to the distance prescription which is a measure of back vertex power. It is therefore necessary to turn the spectacles around so that the arms of the spectacles point towards you
Measure the power of the distance section and compare this to the power of the near section - the difference is the near addition
For astigmatic lenses, simply compare one meridian in the distance to the equivalent meridian in the near - again the difference is the near add
Our Factory
Being more than 30 years, now we are a leading manufacturer of optical instruments in China. We have large quantities of professional technicians and skilled workmen. Many advanced optical-electricity equipments are used in the technological process. Depending on the scientific research advantage of North University of China, we have developed a multi factorial and multi directional produce, management and sale system.

Our Certificate
Taiyuan North China Xinyuan Tech Center(CO., LTD.) is a professional company that produces "Xinyuan" brand glasses industry test equipment.
The company has a complete quality management system and various qualification certificates.

Asked Questions
Hot Tags: auto lensmeter d-910, China, manufacturers, factory, customized, for sale, phoropter simulator, FA 6800 Automatic Computerized Refractor, Auto Lensmeter JD 2000, automated phoropter, Refractometer, supore auto lens edger